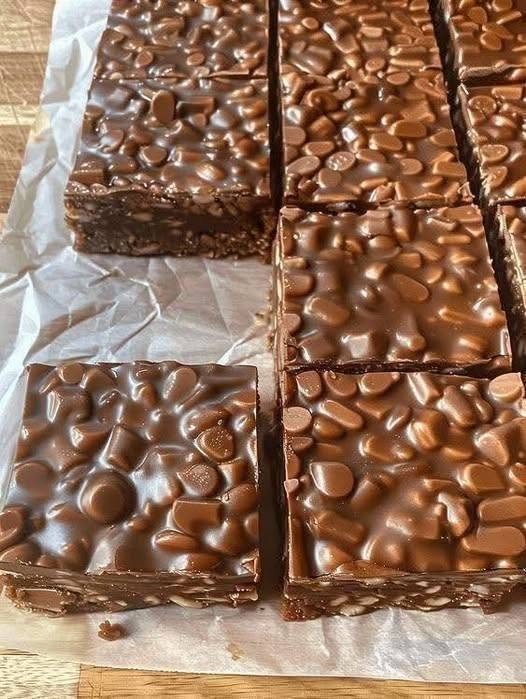

If you love the classic combination of creamy peanut butter and rich chocolate, these No-Bake Peanut Butter Chocolate Bars are an easy dessert to keep in your recipe collection. They require no oven, use simple pantry ingredients, and come together with just a few easy steps.
The bottom layer is soft, rich, and slightly crumbly, with plenty of peanut butter flavor and the familiar texture of graham crackers. A smooth chocolate layer is spread over the top and becomes firm after chilling. Extra chocolate chips can be scattered over the surface for added texture and an inviting finish.
These bars are perfect for family gatherings, holidays, bake sales, lunchboxes, or simply keeping a sweet treat ready in the refrigerator. Since they can also be frozen, they are a convenient make-ahead dessert.
Why You Will Love These Peanut Butter Chocolate Bars
There are many reasons these no-bake bars are such a convenient dessert:
- No oven is required.
- The preparation is simple and straightforward.
- Only a handful of everyday ingredients are needed.
- Peanut butter and chocolate create a rich, satisfying flavor.
- The bars can easily be prepared ahead of time.
- There are plenty of ways to customize them.
- They store well in the refrigerator.
- They can be frozen for longer storage.
- They are great for parties and celebrations.
- They can be cut into small portions for easy serving.
The combination of salty peanut butter and sweet chocolate gives these bars a familiar flavor that works especially well in a chilled dessert.
Ingredients You Will Need
For the Peanut Butter Base
- 1 ½ cups creamy peanut butter
- ½ cup unsalted butter, melted
- 2 cups powdered sugar
- 2 cups graham cracker crumbs
- 1 teaspoon vanilla extract
- ¼ teaspoon salt
For the Chocolate Topping
- 2 cups semi-sweet chocolate chips
- 2 tablespoons creamy peanut butter
- ½ cup milk chocolate chips, optional
- ½ cup extra chocolate chips or chopped chocolate, optional
Both creamy and crunchy peanut butter can be used. Creamy peanut butter creates a smoother base, while crunchy peanut butter adds small pieces of peanuts and extra texture.
For the chocolate topping, semi-sweet chocolate provides a nice balance because the peanut butter base already contains powdered sugar. If you prefer a deeper and less sweet chocolate flavor, dark chocolate can also be used.
Equipment Needed
You do not need complicated kitchen equipment to prepare these bars. Have the following items ready:
- An 8×8-inch or 9×9-inch square baking pan
- Parchment paper
- A large mixing bowl
- A small microwave-safe bowl
- A spatula or wooden spoon
- Measuring cups and spoons
- A sharp knife
- A microwave or double boiler
Preparing your equipment before starting makes the recipe even easier to follow.
How to Make No-Bake Peanut Butter Chocolate Bars
Step 1: Prepare the Pan
Start by lining an 8×8-inch or 9×9-inch square pan with parchment paper.
Leave a few inches of parchment hanging over two opposite sides of the pan. These extra pieces will work as handles, making it much easier to lift the chilled bars from the pan later.
If you prefer, you can lightly grease the parchment paper as well.
An 8×8-inch pan will give you thicker bars, while a 9×9-inch pan will produce slightly thinner pieces.
Step 2: Combine the Peanut Butter and Butter
Add 1 ½ cups of peanut butter to a large mixing bowl.
Pour in the ½ cup of melted unsalted butter and stir well.
Continue mixing until the peanut butter and butter are evenly combined into a smooth mixture.
The melted butter adds richness and also helps the peanut butter combine easily with the dry ingredients.
Allow the melted butter to cool slightly if it is extremely hot before adding it to the peanut butter.
Step 3: Add Vanilla and Salt
Add:
- 1 teaspoon vanilla extract
- ¼ teaspoon salt
Stir until both ingredients are evenly incorporated.
The vanilla adds a subtle background flavor, while the salt helps balance the sweetness and enhances the peanut butter flavor.
Step 4: Add the Powdered Sugar and Graham Cracker Crumbs
Gradually add the 2 cups of powdered sugar and 2 cups of graham cracker crumbs.
Stir as you add each ingredient rather than adding everything at once.
Continue mixing until the ingredients form a thick and soft mixture. The consistency should be similar to a dense cookie dough and should hold together when pressed.
If the mixture feels unusually dry, add 1 tablespoon of peanut butter at a time until it becomes easier to press.
If the mixture is too soft, add a small amount of additional graham cracker crumbs.
Step 5: Press the Mixture Into the Pan
Transfer the peanut butter mixture into the parchment-lined pan.
Use a spatula or the flat bottom of a measuring cup to firmly press the mixture into an even layer.
Make sure you press the mixture well into the corners and try to keep the thickness consistent across the pan.
A firmly packed base helps the finished bars hold together when you cut them.
Once the peanut butter layer is even, place the pan in the refrigerator while you prepare the chocolate topping.
Step 6: Melt the Chocolate
Add 2 cups of semi-sweet chocolate chips and 2 tablespoons of peanut butter to a microwave-safe bowl.
Microwave the mixture for approximately 20–30 seconds at a time.
After each interval, remove the bowl and stir thoroughly.
Continue this process until the chocolate is almost completely melted. The remaining pieces should melt as you stir.
Avoid continuously heating the chocolate because overheating can cause it to develop a grainy texture.
Double-Boiler Method
You can also melt the chocolate using a double boiler.
Place the chocolate chips and peanut butter in a heat-safe bowl over a saucepan containing gently simmering water.
Stir continuously until the mixture becomes smooth.
Make sure the bottom of the bowl does not touch the water.
Step 7: Add the Chocolate Layer
Take the chilled peanut butter base from the refrigerator.
Pour the melted chocolate mixture over the top.
Use a spatula to spread the chocolate evenly from one side of the pan to the other.
Work gently to create a smooth, even chocolate layer.
For extra texture and decoration, sprinkle ½ cup extra chocolate chips or chopped chocolate over the chocolate while it is still melted.
You can also add chopped roasted peanuts if you want additional crunch.
Step 8: Chill Until Firm
Place the pan in the refrigerator and allow the bars to chill for at least 2 hours.
The chilling time allows the peanut butter base to become firm and gives the chocolate topping enough time to set.
If you need to speed up the process, place the pan in the freezer for approximately 30–45 minutes.
Avoid cutting the bars before the chocolate has fully set.
Step 9: Remove and Slice
Once the bars are completely firm, hold the parchment paper handles and carefully lift the entire dessert from the pan.
Place it on a clean cutting board.
Use a sharp knife to cut the slab into 16 squares or smaller rectangles.
For cleaner cuts, briefly dip the knife into hot water, then dry it completely before cutting.
Repeat this process as needed. This can help create neat edges while reducing excessive cracking in the chocolate layer.
Tips for Perfect Peanut Butter Chocolate Bars
1. Choose the Right Peanut Butter
Regular creamy peanut butter is usually the easiest option because it has a consistent texture.
If you use natural peanut butter, stir it very well before measuring because the oil can separate from the peanut mixture.
2. Pack the Base Firmly
Do not simply spread the peanut butter mixture loosely into the pan.
Press it down firmly using the bottom of a measuring cup or a flat spatula. This helps the bars stay together when sliced.
3. Melt the Chocolate Slowly
Short microwave intervals are better than heating the chocolate continuously.
Always stir between intervals to distribute the heat and help the chocolate melt evenly.
4. Allow Enough Chilling Time
The refrigerator helps turn the soft peanut butter mixture into a firm, sliceable dessert.
Allow at least 2 hours of chilling time before cutting.
5. Use Parchment Paper
Parchment paper makes it much easier to remove the finished bars from the pan and helps reduce sticking.
Delicious Variations
1. Crunchy Peanut Butter Bars
Use crunchy peanut butter instead of creamy peanut butter.
The pieces of peanuts add extra texture throughout the base.
2. Dark Chocolate Version
Replace the semi-sweet chocolate with dark chocolate chips.
This gives the topping a deeper chocolate flavor and makes the overall dessert less sweet.
3. Pretzel Peanut Butter Bars
Add crushed pretzels to the peanut butter mixture or sprinkle them over the chocolate topping.
The salty crunch works beautifully with the sweet chocolate.
4. Coconut Peanut Butter Bars
Add approximately ½ cup shredded coconut to the peanut butter base.
For more coconut flavor and texture, sprinkle a little toasted coconut over the chocolate layer.
5. Chocolate Cookie Base
Replace part of the graham cracker crumbs with finely crushed chocolate sandwich cookies.
This creates a more chocolate-forward base.
6. Sea Salt Chocolate Bars
Once the chocolate topping has been spread, sprinkle a very small amount of flaky sea salt over the surface before it sets.
The salty finish provides a pleasant contrast to the sweet chocolate.
Make-Ahead Instructions
These peanut butter chocolate bars are ideal for making ahead.
You can prepare them 1 day before serving and keep them covered in the refrigerator.
When you are ready to serve them, let the bars sit at room temperature for approximately 5–10 minutes if you prefer a slightly softer texture.
For parties and gatherings, making the dessert the day before can make preparation much easier.
How to Store Peanut Butter Bars
Place the finished bars in an airtight container.
Store them in the refrigerator for approximately 1 week for the best quality.
If you stack the bars, place parchment paper between the layers to help prevent them from sticking together.
Keeping them chilled also helps the chocolate topping maintain its firm texture.
Can You Freeze Peanut Butter Chocolate Bars?
Yes, these bars freeze well.
Cut them into individual portions and place them in a freezer-safe container.
Separate the layers with parchment paper so the bars do not stick together.
Freeze for approximately 2–3 months for the best quality.
When you want to enjoy them, thaw them in the refrigerator or allow an individual bar to soften at room temperature for a short time.
You can also eat them directly from the freezer if you prefer a firmer texture.
Serving Suggestions
These bars taste delicious straight from the refrigerator.
For a party or celebration, arrange them on a dessert platter and top them with chopped peanuts or a small amount of flaky salt.
For a more decorative finish, drizzle a little melted white chocolate over the chocolate layer before chilling.
You can also cut the bars into smaller pieces when serving a larger group.
Because these bars are rich, small squares can make a satisfying portion.
Recipe Card
No-Bake Peanut Butter Chocolate Bars
Prep Time: 15 minutes
Chill Time: 2 hours
Total Time: Approximately 2 hours 15 minutes
Servings: 16 bars
Course: Dessert
Cuisine: American
Difficulty: Easy
Ingredients
Peanut Butter Base
- 1 ½ cups creamy peanut butter
- ½ cup unsalted butter, melted
- 2 cups powdered sugar
- 2 cups graham cracker crumbs
- 1 teaspoon vanilla extract
- ¼ teaspoon salt
Chocolate Topping
- 2 cups semi-sweet chocolate chips
- 2 tablespoons peanut butter
- ½ cup milk chocolate chips, optional
- ½ cup extra chocolate chips or chopped chocolate, optional
Directions
- Line an 8×8-inch or 9×9-inch square pan with parchment paper, leaving extra parchment over two opposite sides.
- Combine the peanut butter and melted butter in a large mixing bowl.
- Add the vanilla extract and salt, then mix well.
- Gradually add the powdered sugar and graham cracker crumbs.
- Stir until a thick mixture forms.
- Press the peanut butter mixture firmly and evenly into the prepared pan.
- Refrigerate the base while preparing the chocolate topping.
- Melt the semi-sweet chocolate chips and peanut butter in short microwave intervals, stirring thoroughly between each interval.
- Pour the melted chocolate mixture over the chilled peanut butter base.
- Spread the chocolate into an even layer.
- Sprinkle with additional chocolate chips or chopped chocolate if desired.
- Refrigerate for at least 2 hours, or freeze for approximately 30–45 minutes if you need to speed up the process.
- Once firm, lift the dessert from the pan using the parchment paper.
- Place it on a cutting board and cut into 16 squares or smaller rectangles.
- Serve chilled, or allow the bars to soften slightly before serving.