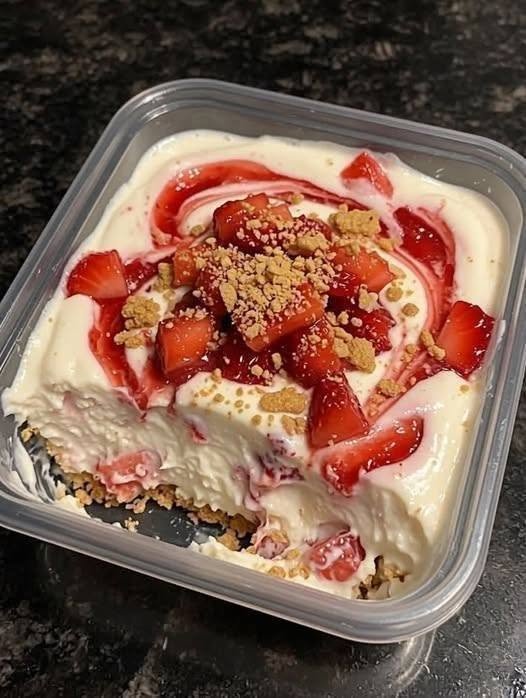

If you love creamy cheesecake and fresh strawberries, this Strawberry Cheesecake is a dessert worth making for special occasions or whenever you want something homemade and impressive. It combines a buttery biscuit crust, a smooth baked cream cheese filling, and a bright homemade strawberry topping.
The cheesecake has a rich but pleasantly light texture. The creamy filling is balanced by the fresh strawberries, which add natural sweetness and a little acidity. The biscuit crust is pressed across the bottom and up the sides, giving each slice a generous layer of buttery crunch.
This cheesecake is ideal for birthdays, family gatherings, dinner parties, holidays, bake sales, or simply when you want a beautiful dessert that can be prepared ahead of time.
What Makes This Baked Strawberry Cheesecake Special?
The best part of this strawberry cheesecake is the contrast between its three main layers.
The biscuit crust is firm and buttery, the cream cheese filling is smooth and creamy, and the strawberry topping is soft, fruity, and glossy. Together, these textures create a dessert that feels rich without needing complicated decoration.
Fresh strawberries also give the cheesecake a naturally attractive finish. Their bright color stands out against the creamy filling, so you can create an impressive-looking dessert without adding lots of decoration.
Although this is not a quick recipe, the actual preparation is quite straightforward. You can break the process into three main stages:
- Prepare the biscuit crust.
- Mix and bake the cheesecake filling.
- Prepare the fresh strawberry topping.
Most of the total time comes from cooling and chilling. These steps are important because they allow the cheesecake to firm up properly and give the strawberry topping time to reach the right consistency.
Preparing the Biscuit Cheesecake Base
The biscuit base provides the foundation for the entire cheesecake. Plain biscuits are crushed into fine crumbs and combined with melted unsalted butter until the mixture resembles wet sand.
This consistency is important because the crumbs need to pack together firmly inside the springform pan. If the mixture is too loose, the crust may break apart when you try to slice or serve the cheesecake.
One special feature of this recipe is that the biscuit mixture is not only spread across the bottom. It is also pressed up the sides of the pan almost to the top.
This creates a thicker biscuit edge and gives each slice a satisfying combination of creamy cheesecake and buttery biscuit.
A flat-bottomed measuring cup is useful for pressing the crumbs evenly across the base and against the sides.
Choosing the Right Biscuits
The recipe allows you to use different plain biscuits depending on where you live.
- Arnott’s Marie crackers are suitable in Australia.
- Graham Crackers work well in the United States.
- Digestives are a popular option in the United Kingdom.
The most important thing is to use a plain biscuit that can be crushed into fine crumbs and combined with melted butter.
Different biscuits can create slightly different textures. Marie crackers tend to produce a fine, sandy crumb, while Graham Crackers can create a somewhat crunchier crust. Digestives have their own distinctive flavor and texture.
Regardless of which biscuit you choose, the finished crumb mixture should resemble wet sand and stay firmly packed when pressed into the pan.
Preparing the Springform Pan
This recipe uses a 20cm/8-inch springform cake tin.
Preparing the pan properly makes it much easier to remove the finished cheesecake without damaging the crust.
The base of the springform pan is turned upside down before the parchment paper is added. This removes the raised ridge found on some springform bases and creates a smoother surface, making it easier to slide the cheesecake onto a serving platter.
Lightly butter the base, place parchment paper over it, and secure the paper by clipping the springform sides into position.
The sides should also be buttered and lined with parchment.
Once the crust is added, check that it is reasonably even, especially around the sides. A properly prepared pan helps the cheesecake keep its clean shape.
Making the Creamy Cheesecake Filling
The filling begins with softened cream cheese.
Beat the cream cheese only until it becomes smooth and the lumps disappear. Cheesecake filling does not need to be beaten like a sponge cake because incorporating too much air can contribute to cracks or an uneven surface during baking.
Once the cream cheese is smooth, add the plain flour and mix briefly.
Next, add:
- Vanilla extract
- Sour cream
- Caster sugar
- Lemon zest
These ingredients work together to create a rich and balanced cheesecake flavor.
The sour cream adds creaminess, vanilla provides warmth, sugar adds sweetness, and lemon zest gives the filling a gentle citrus flavor that works particularly well with strawberries.
Why You Should Avoid Overmixing
Overmixing is one of the easiest mistakes to make when preparing baked cheesecake.
Once the cream cheese is smooth, the remaining ingredients only need enough mixing to become incorporated. Add the eggs one at a time and mix briefly after each addition.
Once the final egg has disappeared into the batter, stop mixing.
Using softened cream cheese and room-temperature eggs makes the ingredients easier to combine. Cold ingredients can make the mixture harder to blend smoothly and may encourage unnecessary mixing.
The finished batter should look creamy and uniform rather than unusually fluffy.
Baking the Cheesecake Correctly
Preheat your oven to:
- 160°C/320°F for a standard oven
- 140°C/295°F for a fan/convection oven
Pour the cheesecake filling into the prepared biscuit crust.
Bake for approximately 55 minutes.
The surface should become very lightly golden and mostly flat rather than deeply browned.
When you carefully shake the pan, the center should still have a slight jiggle.
Do not wait for the entire cheesecake to become completely firm in the oven. The filling will continue to set while it cools and chills.
Overbaking can lead to a dense or dry texture, so the gentle movement in the center is an important sign that the cheesecake is ready.
Cooling the Cheesecake Gradually
Cooling is an important part of the process.
After baking, allow the cheesecake to cool inside the oven with the door open approximately 20cm/8 inches.
This gradual temperature change helps reduce the possibility of cracks forming across the surface.
After cooling, place the cheesecake in the refrigerator while it is still in the pan for at least 4 hours.
The chilling time allows the filling to become firm and makes it easier to remove the springform sides.
Avoid trying to remove or handle the cheesecake while it is still warm because the filling and crust can be more delicate.
Making the Fresh Strawberry Topping
The strawberry topping gives this cheesecake its bright color and fresh fruit flavor.
The recipe uses strawberries in two forms: diced strawberries for the sauce and halved strawberries for the finished topping.
The diced strawberries are cooked with white sugar, vanilla extract, and lemon juice or water. As the mixture simmers, the fruit softens and releases its juices, creating a fragrant strawberry sauce.
The strawberry topping should complement the creamy cheesecake rather than overpower it.
Getting the Strawberry Sauce Consistency Right
The topping should be syrupy and soft rather than completely solid.
It needs enough body to stay on the cheesecake, but it should still have a slightly flowing texture when the cake is sliced.
Remember that the sauce becomes thicker as it cools. For this reason, do not make it excessively thick while it is still on the stove.
Once the topping has cooled, stir it and check its consistency.
If it has become too thick, add a very small amount of water. Add the water carefully because even a small quantity can loosen the sauce.
The finished consistency should be closer to soft jam than firm jelly.
Assembling the Strawberry Cheesecake
Once the cheesecake has chilled thoroughly, carefully remove the sides of the springform pan.
Use the parchment overhang to help move the cheesecake from the base, then gently remove the paper.
Work carefully because the cheesecake is firm after chilling but can still be damaged by rough handling.
Spoon the cooled strawberry topping over the surface.
Arrange the strawberry halves cut-side down where needed to create a neat finish.
Once the topping has been added, return the cheesecake to the refrigerator for at least 2 additional hours.
This final chilling period helps the strawberry topping settle and ensures the cheesecake is cold and firm when sliced.
How to Serve Strawberry Cheesecake
For clean slices, use a sharp knife and wipe it between cuts.
Cleaning the knife between slices helps prevent the strawberry sauce from spreading too much across the creamy filling.
The cheesecake is flavorful enough to serve on its own because the buttery biscuit crust, creamy filling, and fresh strawberry topping already provide plenty of contrast.
Any remaining strawberry sauce can be served alongside individual slices for anyone who wants extra fruit topping.
A simple cake stand or serving platter is enough to present this dessert beautifully.
Tips for a Smooth Cheesecake
The smooth texture starts with properly softened cream cheese and controlled mixing.
Avoid beating the filling longer than necessary, especially after adding the eggs. Excessive air can affect the appearance of the finished cheesecake.
Room-temperature eggs are also easier to incorporate into the cream cheese mixture.
Temperature control during baking and cooling is equally important. Use the correct oven temperature, avoid excessive baking, and allow the cheesecake to cool gradually inside the oven.
These small details can make a noticeable difference in the final texture and appearance.
How to Get the Best Strawberry Flavor
Fresh strawberries are the main flavor of the topping, so choose berries that are ripe, fresh, and attractive.
Because the recipe uses both diced and halved strawberries, choose fruit that is firm enough to maintain its shape during preparation.
Remove any damaged portions before preparing the topping.
The recipe allows lemon juice or water in the strawberry sauce.
Lemon juice can add extra brightness when the strawberries are less sweet, while water can be used when the fruit already has plenty of natural sweetness.
Can Strawberry Cheesecake Be Made Ahead?
Yes, this cheesecake is well suited to advance preparation.
The baked cheesecake needs at least 4 hours of refrigeration before it can be removed from the pan, so making it ahead works naturally with the recipe.
The strawberry topping can also be prepared separately, cooled, and stored until the cheesecake is ready for assembly.
For a gathering, preparing the cheesecake ahead of time can make the final serving process much easier.
How to Store Strawberry Cheesecake
Because this dessert contains cream cheese, sour cream, and eggs, it should be kept refrigerated.
Store the cheesecake covered or in a suitable cake container to protect the surface and prevent it from absorbing odors from other foods in the refrigerator.
For the best quality, enjoy the cheesecake within approximately 4 days.
After two or three days, some moisture may appear on the strawberry topping. This can slightly change its appearance, but the dessert can still remain enjoyable when properly refrigerated.
Common Strawberry Cheesecake Mistakes
Overbaking the Cheesecake
One common problem is waiting for the entire cheesecake to become completely firm in the oven.
The center should still have a slight jiggle when the cheesecake is ready. It will continue to set during cooling and refrigeration.
Overmixing the Filling
Mixing the filling for too long can incorporate excessive air.
Once the ingredients are combined and the final egg has been incorporated, stop mixing.
Cooling Too Quickly
Sudden temperature changes can contribute to cracks.
Allow the cheesecake to cool gradually inside the oven with the door open approximately 20cm/8 inches.
Making the Strawberry Sauce Too Thick
The sauce becomes thicker as it cools. Avoid reducing it too much on the stove.
If it becomes too thick after cooling, carefully add a tiny amount of water to loosen it.
Recipe Notes
Biscuit Crust
The biscuit crumbs should be fine enough to resemble wet sand when mixed with melted butter.
If you do not have a food processor, crush the biscuits in a ziplock bag using a rolling pin or another heavy object.
Cream Cheese
Full-fat cream cheese is preferred for a rich, creamy filling.
If only spreadable cream cheese in tubs is available, the original recipe specifies skipping the sour cream because spreadable cream cheese is softer.
Strawberry Sauce
The strawberry topping should remain soft and glossy rather than becoming a firm jelly.
It should gently ooze when the cheesecake is cut.
Cooling
Gradually cooling the cheesecake inside the oven helps reduce sudden temperature changes and can help prevent surface cracks.
Measurements
Cup and spoon measurements can vary between countries, and different biscuits may produce slightly different crust textures. Follow the listed quantities and use an appropriate plain biscuit available in your region.
Frequently Asked Questions
Why does baked cheesecake need to chill for so long?
Chilling allows the cream cheese filling to firm after baking. It also makes the cheesecake easier to remove from the springform pan and slice cleanly.
Should the cheesecake crack?
A crack does not ruin the cheesecake, although a smooth surface is preferred. Careful mixing, controlled baking, and gradual cooling can help reduce the chance of cracks.
The strawberry topping can also cover small imperfections on the surface.
How should the strawberry topping look?
The topping should have a soft, loose jam-like consistency. It should be thick enough to sit on the cheesecake while remaining slightly fluid when the cake is cut.
Can I use different plain biscuits?
Yes. Marie crackers, Graham Crackers, and Digestives are all suitable options according to the original recipe. The final texture and flavor may vary slightly depending on the biscuit used.
How long does strawberry cheesecake last?
The cheesecake should be refrigerated and is best enjoyed within approximately 4 days. Its texture and appearance are generally at their best during the first few days.
Recipe Card
Strawberry Cheesecake
Course: Dessert
Cuisine: Western
Difficulty: Medium
Servings: 12
Prep Time: 30 minutes
Cooking Time: 55 minutes
Chilling Time: 6 hours
Total Time: 7 hours 25 minutes
Calories: 489 kcal
Description
A rich yet creamy baked strawberry cheesecake featuring a buttery biscuit crust, smooth cream cheese filling, lemon zest, and a glossy homemade strawberry topping. Fresh diced strawberries create the sauce, while halved strawberries add an attractive fruity finish.
Ingredients
Cheesecake Biscuit Base
- 200g / 7oz Arnott’s Marie crackers or other plain biscuit (Australia), or 28 Graham Cracker squares
- 120g / 8 tbsp unsalted butter, melted
Cheesecake Filling
- 1 lb / 500g cream cheese, softened
- 2 tbsp plain flour (all-purpose flour)
- 1 tsp vanilla extract
- ½ cup sour cream (full-fat)
- 1½ cups caster sugar (superfine sugar)
- Zest of 1 lemon
- 3 eggs, at room temperature
Strawberry Topping
- ½ cup white sugar
- ½ tsp vanilla extract
- 1½ tsp cornflour/cornstarch
- 2 tbsp water
- Fresh strawberries, diced and halved as required for the topping
- Lemon juice or water, as specified for the strawberry sauce
Directions
Prepare the Oven and Cake Pan
- Preheat the oven to 160°C/320°F for a standard oven or 140°C/295°F for a fan/convection oven.
- Prepare a 20cm/8-inch springform cake tin by turning the base upside down.
- Lightly butter the base and place a square of parchment/baking paper over it.
- Secure the parchment by clipping the springform sides into place.
- Butter and line the sides of the pan.
Make the Biscuit Crust
- Break the biscuits into smaller pieces and place them in a food processor.
- Process until they become fine crumbs.
- Add the melted butter and briefly process until evenly combined and the mixture resembles wet sand.
- Transfer the crumb mixture to the prepared springform pan.
- Spread the crumbs across the base and up the sides.
- Use a flat-bottomed measuring cup or similar utensil to firmly press the crumbs against the sides and across the base.
Prepare the Cheesecake Filling
- Beat the softened cream cheese until smooth, using only enough mixing to remove lumps.
- Add the plain flour and mix briefly until incorporated.
- Add the vanilla extract, sour cream, caster sugar, and lemon zest.
- Mix only until the ingredients are combined.
- Add the eggs one at a time, mixing briefly after each addition.
- Stop mixing once the final egg has been incorporated.
- Pour the cheesecake filling into the prepared biscuit crust.
Bake and Cool
- Bake the cheesecake for approximately 55 minutes.
- The surface should be very lightly golden and mostly flat.
- The center should have a slight jiggle when the pan is gently shaken.
- Allow the cheesecake to cool inside the oven with the door open approximately 20cm/8 inches.
- Refrigerate the cheesecake in the pan for at least 4 hours.
- Remove the springform sides once the cheesecake is thoroughly chilled.
- Use the parchment overhang to help slide the cheesecake from the base, then carefully remove the paper.
Prepare the Strawberry Topping
- Place the diced strawberries, vanilla extract, white sugar, and lemon juice or water into a saucepan.
- Stir and bring the mixture to a simmer over medium heat.
- Simmer for approximately 10 minutes, allowing the diced strawberries to soften and break down.
- Combine the cornflour/cornstarch with the 2 tablespoons of water.
- Stir the cornflour mixture into the saucepan.
- Add the halved strawberries.
- Cook for approximately 1 minute, just until the strawberry halves soften slightly.
- Remove the saucepan from the heat when the sauce becomes syrupy.
- Allow the strawberry topping to cool completely. It will thicken as it cools.
- Stir the cooled topping and adjust the consistency with a very small amount of water if necessary.
Assemble and Chill
- Spoon the strawberry topping over the chilled cheesecake.
- Cover the surface with a single layer of strawberries.
- Arrange the strawberry halves cut-side down for a neat finish.
- Refrigerate the topped cheesecake for at least 2 additional hours.
- Slice with a sharp knife and serve with any remaining strawberry sauce.
Nutrition Facts
- Calories: 489 kcal
- Fat: 28g
- Carbohydrates: 55g
- Fiber: 1g
- Sugar: 41g
- Protein: 5g